
The short answer
A lens edger grinds a round, uncut lens to the shape of the frame opening while keeping the optical center where the prescription needs it. A shape reader supplies the outline, a blocker fixes the lens on a block at the right centration and axis, and the edger clamps the block, rough-grinds the lens close to size, then finishes the edge with a bevel, groove or flat edge. Many edgers can also polish the edge and add a safety bevel.
The parts of a lens edging system
An edging system has two stages before grinding starts and one chamber where the grinding happens. On some machines all three sit in one cabinet; on others the shape reader and blocker are a separate unit.
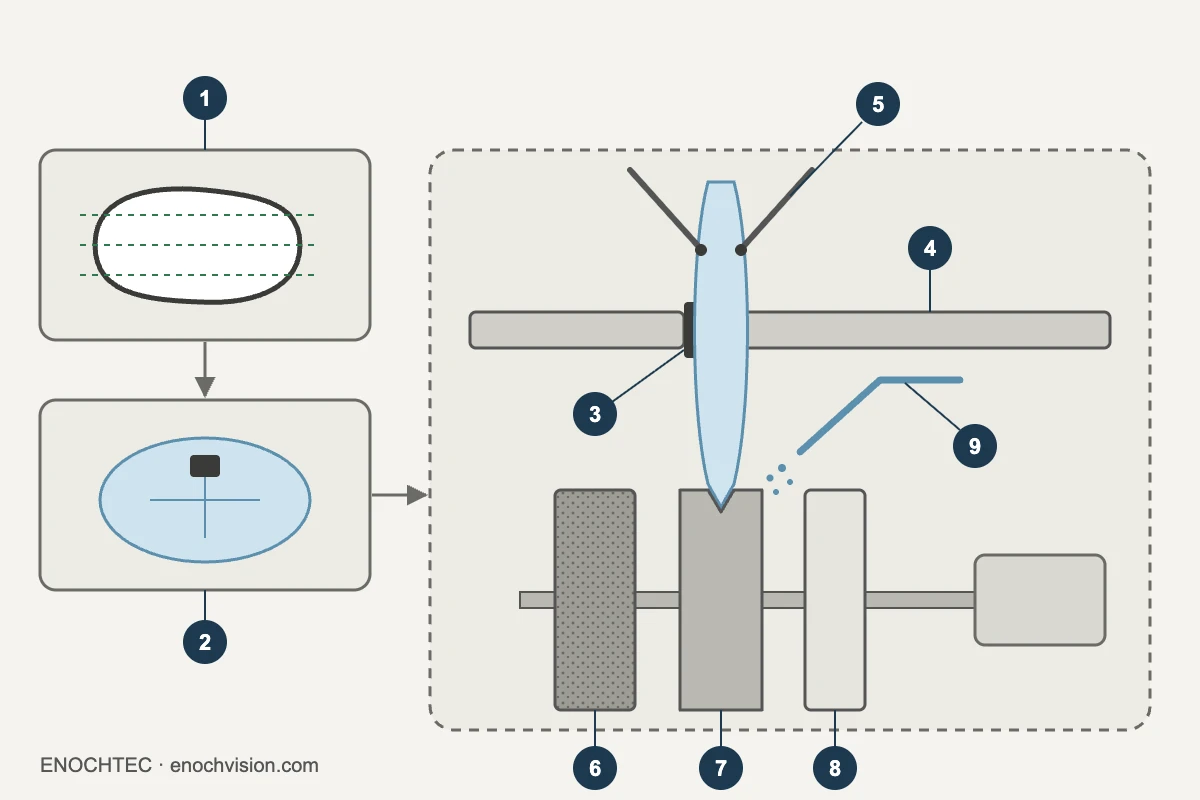
- Shape reader: a frame tracer, an optical scanner or a template. It turns the frame opening or the demo lens into the outline the edger will cut.
- Centering and blocking device: shows the lens over a target so you can place the optical center and axis, then sticks a block on the front of the lens at that point.
- Block: a small cup with an adhesive pad. It is the only thing that holds the lens in the edger, so it fixes the lens position and axis for the whole cycle.
- Clamp shafts: two opposed shafts that grip the block and the back of the lens and turn the lens against the wheels.
- Feelers: on many automatic edgers, two arms touch the front and back surfaces to measure the lens before finishing, so the bevel or groove can follow the lens curve.
- Roughing wheel: a coarse diamond wheel that removes most of the material quickly. Edgers that cut glass have a separate glass roughing wheel.
- Finishing wheel: a finer wheel with a V-shaped groove that forms the bevel, and a flat zone for flat edges.
- Polishing wheel: a very fine wheel that turns the matte edge glossy, used where the edge shows.
- Water spray: cools the wheel and carries the swarf away for most materials.
One edging cycle, step by step
- Read the shape. Trace the frame, scan the demo lens, or load a template.
- Verify and mark the lens. Check the power on a lensmeter and mark the optical center and the 180° line.
- Center and block. Set the decentration from the patient's PD and fitting height, line up the axis, and fix the block on the lens front. A 1 mm centration error on a 4 D lens creates 0.4 prism diopters, so this step decides the optics of the finished pair.
- Load and clamp. Put the block into the clamp shaft and close the clamp. Choose the lens material and the edge type on the screen.
- Measure. On edgers with feelers, the arms read the lens surfaces and the edger calculates where the bevel or groove will sit.
- Rough. The lens turns against the roughing wheel until it is a little larger than the final shape.
- Finish. The edge is ground to final size on the finishing wheel, with a V-bevel, a groove or a flat edge.
- Polish and safety bevel (optional). Polish exposed edges and remove the sharp corner on the back surface.
- Check and touch up. Try the lens in the frame. Small size corrections and safety bevels are done on a hand edger.
- Final inspection. Check the mounted lenses on the lensmeter against the prescription.
Bevel, groove or flat edge
The frame decides the edge. The edger has to know which one before it finishes the lens.
| Edge | Frame | How it is made |
|---|---|---|
| V-bevel | Full-rim frames | The V-groove of the finishing wheel. The bevel usually sits toward the front of the lens, so less edge shows behind the rim. |
| Mini bevel | Thin metal rims | A smaller bevel that seats in narrow eyewires, on edgers that offer it, such as the SJG-910A. |
| Flat edge with groove | Semi-rimless (nylon cord) | Flat finish, then a groove cut on the edger, as on the SJG-1000AK, or on a separate groover. |
| Flat edge | Rimless (drill mount) | Flat finish, usually polished, with a small safety bevel on both sides before drilling. |
How lens material changes the cycle
- CR-39 and other resins: edge wet, with a steady water flow.
- Polycarbonate: softens with heat. Equipment makers rough it dry or with little water and a sharp wheel, and select the polycarbonate cycle so the edger slows down. Clean the swarf out between lenses.
- High-index: edges like resin but smells strongly when cut, so ventilation helps.
- Glass: needs a glass roughing wheel. Clean the chamber before you go back to plastic.
- Coated lenses: slippery hydrophobic coatings can let the lens turn on the block. Use the pads made for them and the edger's lower clamping pressure or special cycle.
Choosing the wrong material on the screen is a common cause of damaged lenses and wheels: the cycle, speed and water are set by that choice.
Common edging problems and their usual cause
| Problem | Usual cause | What to do |
|---|---|---|
| Axis off after edging | The lens turned on the block, often on a hydrophobic coating or with a worn pad | Fresh pads, the coated-lens setting, lower clamping pressure |
| Lens too large or too small | Size not calibrated, or a size offset left from an earlier job | Edge a test lens, then calibrate the size |
| Bevel shows in front of the rim | Bevel position set too far back for the base curve | Move the bevel toward the front, or use the auto bevel setting |
| Chipped or scored edge | Worn wheel, or a wheel loaded with material | Dress the wheel if the manual allows it, or replace it |
| Smeared or melted polycarbonate edge | Resin cycle used on polycarbonate | Select polycarbonate on the screen; check the wheel |
Patternless, scanner, template and hand edgers
Edgers differ mainly in how they read the shape and how much they finish on their own:
- Patternless with an optical scanner: the SJG-1000AK captures the shape in 0.5 s and also grooves; the SJG-900 also edges glass.
- Automatic with a separate scanner: the ALE-1900 images the lens and guides centering on its own screen.
- Template: the AE-688 edges to a template held in a clamp.
- Hand edger: the CP-7A-35WV and LY-316, where the optician holds the lens against the wheel. Most labs with an automatic edger keep one for touch-ups and safety bevels.
To compare all eight models side by side, see Lens Edgers.
Background sources: Lens edging apparatus, US patent 4,233,784 · Neksia edger user manual (Essilor Instruments) · Edging polycarbonate and CR-39 with diamond wheels, US patent 5,711,700
Questions
What are the main parts of a lens edger?
A shape reader (tracer, scanner or template), a centering and blocking device, clamp shafts that hold the blocked lens, and a set of wheels: roughing, finishing with a V-groove, and often polishing. Many automatic edgers also have feelers that measure the lens surfaces.
What is the difference between roughing and finishing?
Roughing removes most of the material quickly on a coarse wheel and leaves the lens slightly oversize. Finishing grinds it to the final size on a finer wheel and forms the bevel, groove or flat edge.
Why does a lens have to be blocked before edging?
The block fixes the lens at the right decentration and axis, and it is what the edger clamps. If the lens is blocked in the wrong place, the finished pair has unwanted prism or a wrong axis.
Can one edger cut plastic, polycarbonate and glass?
Only if it has the right wheels and cycles. Glass needs a glass roughing wheel, and polycarbonate needs its own cycle. Check each model before you order, for example the SJG-900 edges glass as well as resin and PC.
Do I still need a hand edger if I have an automatic edger?
Most labs keep one. It handles small size corrections, safety bevels and touch-ups without running the lens through the edger again.