
The short answer
Rimless and semi-rimless lenses are edged flat, given a small safety bevel on both sides and polished first. A rimless lens is then drilled, with holes that follow the curve of the lens, chamfered on both faces and fitted with bushings. A semi-rimless lens gets a groove about 0.6 mm wide in its flat edge for the nylon cord. Trivex and polycarbonate are the usual materials; glass is best kept out of both.
What you are making
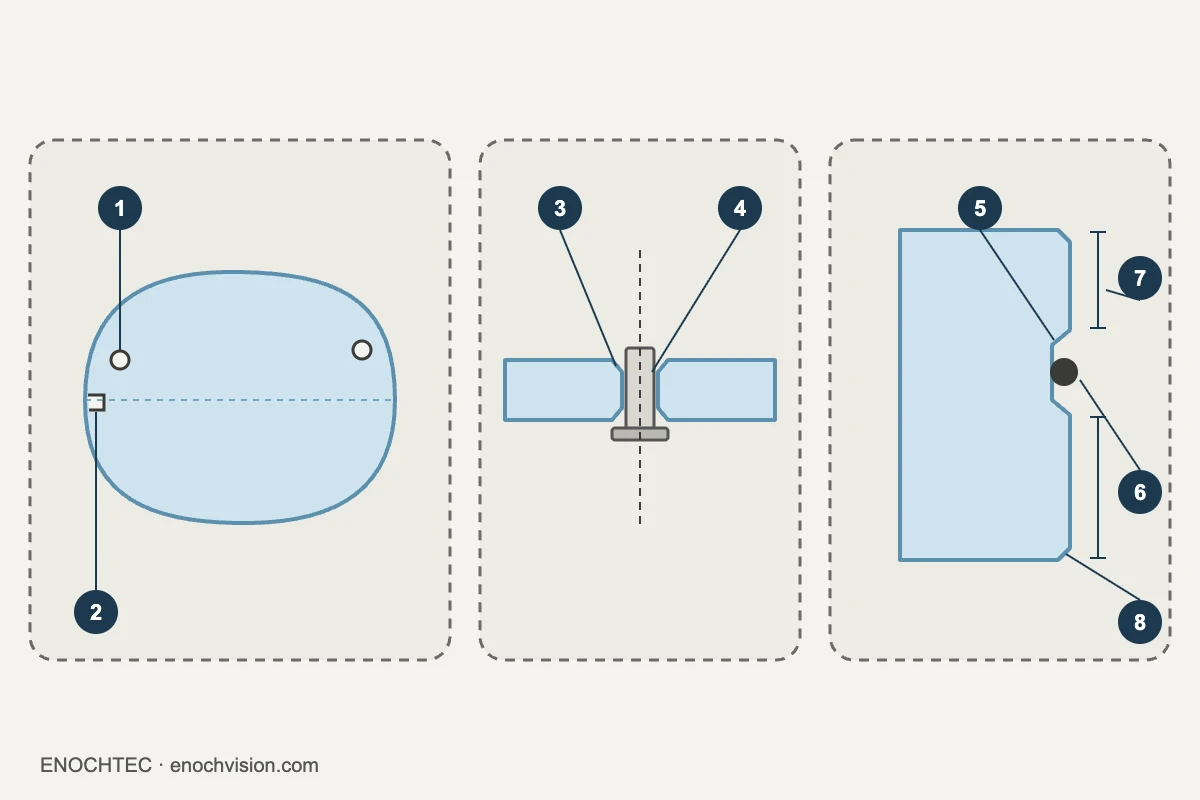
- Drill hole: for the screw or bushing of the bridge and the temple fitting.
- Notch: a slot cut into the edge, for mounts that clamp into the lens edge as well as through a hole.
- Chamfer: a small bevel around the hole on both faces. It removes the rough surface and small fractures the drill leaves.
- Bushing: a plastic sleeve in the hole, so the metal fitting never presses directly on the lens.
- Groove: cut into the middle of the flat edge of a semi-rimless lens.
- Nylon cord: sits in the groove and holds the lens against the upper rim.
- Groove walls: the lens material left in front of and behind the groove. Too thin and they chip.
- Safety bevel: a small bevel on the edge corners, made after edging.
The order of work
Each frame type needs a different edge, but the sequence is the same: edge, polish, then drill or groove, then mount and inspect. Polishing before grooving keeps compound and debris out of the groove.
| Frame | Edge | Then | Our machines |
|---|---|---|---|
| Rimless (drill mount) | Flat, safety bevel both sides, polished | Drill, ream, chamfer, notch if needed | CP-2A or CP-24A, CP-8B to polish |
| Semi-rimless (nylon cord) | Flat, polished | Groove | CP-3-800, or an edger that grooves such as the SJG-1000AK |
Drilling a rimless lens, step by step
- Choose the material. Trivex is the first choice for drill mounts and polycarbonate the second, because they resist cracking at the holes. Keep glass out of rimless frames.
- Edge and polish. Edge to shape with a flat edge, add a small safety bevel on both sides and polish the edge.
- Mark the holes. Line the lens up with the demo lens of the frame on the 180° line and mark the hole positions on the front surface.
- Set the drill angle. Drill along the curve of the lens front, not straight down, so the fitting sits flat against the surface.
- Drill. Use sharp bits, light pressure and a speed suited to the material: slow down for polycarbonate, which softens at high speed. Heat from too much speed or pressure starts cracks. On the CP-2A and CP-24A, opposing taper bits drill from both faces at the same point, which limits chipping where the bit breaks through.
- Ream to size. Open the hole to the size the bushing needs and check the fit.
- Chamfer both faces. Smooth the edge of each hole with a chamfering tool.
- Cut notches where the mount needs them. The CP-24A has two slotting stations, marked 1.0 mm and 0.8 mm, with adjustable depth.
- Mount. Press the bushings in from the back; they should be a tight fit. Use top-hat washers and a metal washer under the nut, and keep acetone and thread-lock away from polycarbonate.
Grooving a semi-rimless lens, step by step
- Edge flat to size and check the edge thickness: about 2.2–2.5 mm leaves room for the groove and both walls.
- Polish the edge where it will show.
- Place the groove. Center it on the edge. On thick minus lenses, move it toward the front so less edge shows.
- Set the depth to suit the cord. The CP-3-800 has depth settings 0–7 and moves left and right to place the groove.
- Groove. On the CP-3-800 a groove takes about 30 seconds.
- Inspect the groove under magnification, then fit the cord.
| Figure | Typical value |
|---|---|
| Nylon cord thickness | 0.5–0.7 mm |
| Groove width | about 0.6 mm |
| Wall each side of the groove | about 0.9 mm |
| Edge thickness | about 2.2–2.5 mm |
| CP-3-800 lens range | 28–60 mm diameter, 1.5–11.0 mm thick |
Common faults and their cause
| Fault | Usual cause | What to do |
|---|---|---|
| Cracks starting at a hole | No chamfer, heat from drilling, an over-tight fitting, or acetone and thread-lock on polycarbonate | Chamfer every hole, drill cooler, tighten less, keep solvents away |
| Mount keeps working loose | Holes drilled too large | Remake the lens with smaller holes and a tight bushing |
| Fitting does not sit flat | Hole drilled straight instead of along the lens curve | Set the drill angle to the front curve |
| Chipped groove wall | Edge too thin, groove off center, or a worn cutter | Check edge thickness, center the groove, replace the cutter |
| Cord slips out of the groove | Groove too shallow or cord too thin | Set the depth to the cord and use the right cord |
Background sources: Ask the labs: grooving, drilling direction and chamfering (Eyecare Business) · Ask the labs: drilled and grooved rimless (Eyecare Business) · Fix and fit: bushings (Eyecare Business) · Eight tips for processing rimless or semi-rimless eyewear (Eyecare Business)
Questions
Which lens material is best for rimless drill mounts?
Trivex first and polycarbonate second, because they resist cracking at the holes. Glass is best kept out of rimless and semi-rimless frames.
Should I polish before or after grooving?
Before. Edge first, polish second, groove third, so polishing compound and debris stay out of the groove.
Why chamfer drill holes?
Every drill leaves a rough surface and small fractures around the hole. A chamfer on both faces removes them and reduces cracking and chipping.
How wide and deep should a semi-rimless groove be?
For nylon cord of 0.5–0.7 mm, a groove about 0.6 mm wide with roughly 0.9 mm of wall on each side, on an edge about 2.2–2.5 mm thick. Set the depth to suit the cord.
Do I need a drill if my edger can groove?
An edger that grooves, such as the SJG-1000AK, covers semi-rimless work. Rimless drill mounts still need a drill such as the CP-2A, or the CP-24A if the mounts also need notches.